Learning how to use Rytr is one of the fastest ways to speed up your content workflow. The tool is genuinely easy to get started with — but knowing which features to use and when makes the difference between decent output and content you’re proud to publish.
This step-by-step Rytr tutorial covers everything a beginner needs: account setup, the key features, the best templates for bloggers, and a complete walkthrough of writing your first AI-assisted blog post from start to finish.
Don’t have a Rytr account yet? Start free here — no credit card needed →
What Is Rytr and Why Should Bloggers Use It?
Rytr is an AI writing assistant with over 40 pre-built templates covering blog posts, social media, email copy, product descriptions, and more. Instead of starting from a blank page, you select a template, fill in a few details about your topic, and Rytr generates a working first draft in seconds.
For bloggers the core benefit is speed. A blog post outline that used to take 20 minutes takes 30 seconds. A 200-word section that used to take 30 minutes takes 2 minutes to generate and edit. Over a full week of publishing, that time saving compounds into hours.
→ Read our full Rytr review for a complete breakdown of features and pricing.
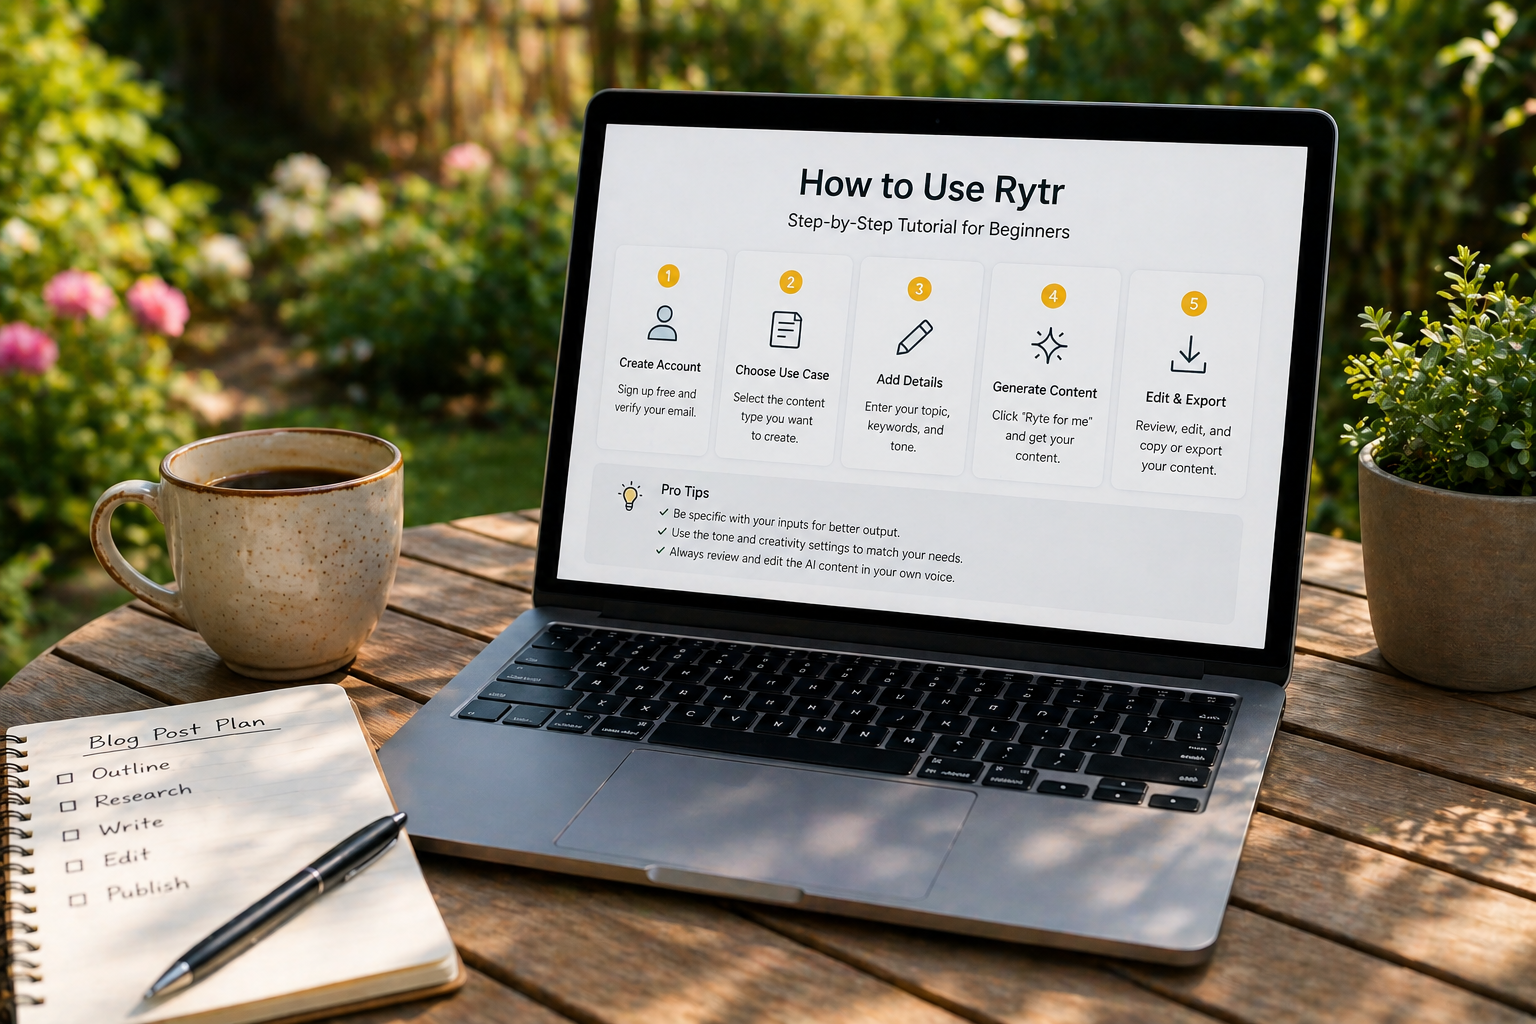
How to Use Rytr: Getting Started
Step 1 — Create Your Free Account
Go to rytr.me and click Get started for free. Sign up with your Google account or email address. No credit card required for the free plan.
The free plan gives you 10,000 characters per month — enough to write 3-4 complete blog posts and properly test whether Rytr fits your workflow before committing to a paid plan.
Step 2 — Explore the Dashboard
When you log in for the first time you’ll see Rytr’s main editor. Here’s what you’re looking at:
- Use Case dropdown — the template selector. This is where you choose what type of content you want to create
- Language selector — Rytr supports 30+ languages
- Tone selector — choose from 20+ tones including convincing, enthusiastic, formal, and conversational
- Creativity slider — controls how creative vs conservative the output is. Start at medium (3) and adjust from there
- Input fields — these change based on your selected use case
- Generate button — runs the AI and produces your output
Step 3 — Install the Chrome Extension
Before diving into templates, install the Rytr Chrome extension. This lets you use Rytr anywhere you write online — inside WordPress, Google Docs, email, and social media — without switching tabs.
Go to Settings → Integrations → Chrome Extension and follow the install instructions. Takes two minutes and is genuinely worth it for day-to-day use.
How to Use Rytr’s Best Templates for Bloggers
Rytr has 40+ templates but as a blogger you’ll use the same 5-6 most of the time. Here’s exactly how to use each one.
Template 1 — Blog Post Outline
This is the template you’ll use most. It generates a complete structured outline for any blog post topic in seconds.
How to use it:
- Select Blog Post Outline from the Use Case dropdown
- Enter your Blog Post Topic — be specific. “AI writing tools for bloggers” works better than just “AI tools”
- Add Keywords you want to target — optional but recommended for SEO
- Select your Tone — Convincing works well for most blog content
- Click Ryte for me
You’ll get a structured outline with H2 and H3 headings in about 10 seconds. Generate 2-3 variations and combine the best elements from each. This takes 2-3 minutes and gives you a solid writing framework.
Template 2 — Blog Section Writing
This is the core drafting template. Once you have your outline, use this to write each section one at a time.
How to use it:
- Select Blog Section Writing from the Use Case dropdown
- Enter the Section Heading from your outline
- Add Context — 1-2 sentences describing what this section should cover
- Set Creativity to 3-4 for informational content
- Click Ryte for me
Pro tip: Generate each section separately rather than trying to generate the whole article at once. Section-by-section generation gives you more control and consistently better output.
Template 3 — Blog Post Intro
Generates a compelling introduction for any blog post. Useful as a starting point even if you rewrite it in your own voice afterward.
How to use it:
- Select Blog Post Intro
- Enter your Blog Post Topic
- Add your target Audience — “bloggers and content creators” for most of your content
- Generate and edit to match your voice
Template 4 — SEO Meta Description
Generates optimized meta descriptions for your articles. Much faster than writing them manually.
How to use it:
- Select SEO Meta Description
- Enter your Blog Post Topic or Title
- Add your target Keyword
- Generate — usually takes the first or second output with minor editing
Template 5 — Content Improver
Paste in any paragraph you’ve written and Rytr rewrites it to be clearer, more engaging, or better structured. Excellent for polishing rough AI-generated sections or improving your own writing.
How to use it:
- Select Content Improver
- Paste in your paragraph
- Select the improvement direction — clearer, more engaging, more concise
- Generate and compare with your original
How to Use Rytr to Write a Complete Blog Post
Here’s the full workflow for writing a complete blog post using Rytr — from blank page to ready-to-publish draft.
Step 1 — Generate Your Outline (5 minutes)
Use the Blog Post Outline template with your target keyword. Generate 3 variations and build your final outline by combining the best headings from each. Edit to match your specific angle and remove any sections that don’t fit.
Step 2 — Write Your Introduction (5 minutes)
Use the Blog Post Intro template to get a starting point. Rewrite it in your own voice — add a personal hook, a specific pain point your reader has, or a surprising statistic. The intro is the most important section for reader retention so spend real time on it.
Step 3 — Draft Each Section (20-25 minutes)
Work through your outline using the Blog Section Writing template. For each section: enter the heading, add 1-2 sentences of context, generate, read the output, edit what doesn’t sound right, and move to the next section. At 3-4 minutes per section a 6-8 section article takes about 25 minutes to draft.
Step 4 — Write Your Conclusion (5 minutes)
Write this yourself. Your conclusion needs to summarize the key takeaway and tell the reader exactly what to do next. AI-generated conclusions tend to be generic — this one is worth writing manually.
Step 5 — Edit the Full Draft (10 minutes)
Read the complete article out loud. Fix anything that sounds robotic, add your personal perspective in at least 2-3 places, verify any facts or statistics, and check that the article flows naturally from section to section. Use the Content Improver template on any paragraph that feels weak.
Step 6 — Generate Your Meta Description (2 minutes)
Use the SEO Meta Description template to generate 3 options. Pick the best one, edit slightly for your exact keyword, and paste it into your SEO plugin.
Total time: 45-60 minutes for a complete 1,000-1,500 word blog post.
How to Use Rytr’s Tone Controls Effectively
Tone controls are one of Rytr’s most underused features. Matching the tone to your content type significantly improves output quality.
| Content Type | Recommended Tone | Why It Works |
|---|---|---|
| Blog post reviews | Convincing | Creates persuasive, benefit-focused copy |
| How-to guides | Informative | Clear, step-by-step output |
| Personal blog posts | Conversational | Sounds more human and relatable |
| Product comparisons | Analytical | Structured, balanced output |
| Email newsletters | Enthusiastic | Energetic tone that drives clicks |
| Social media posts | Humorous or Witty | More engaging and shareable |
How to Use Rytr’s Creativity Slider
The creativity slider (1-5) controls how adventurous Rytr’s output is:
- Level 1-2: Conservative, predictable output. Good for factual content where accuracy matters
- Level 3: Balanced — the best starting point for most content
- Level 4-5: More creative and varied output. Good for social media, email, and creative writing but requires more editing for factual accuracy
For blog content start at level 3. If the output feels too generic try level 4. If it starts making up facts or going off-topic drop back to level 2.
Rytr Pricing: Which Plan Do You Need?
| Plan | Price | Characters/month | Best for |
|---|---|---|---|
| Free | $0/month | 10,000 | Testing the workflow |
| Unlimited | $9/month | Unlimited | Bloggers publishing 2-4x per week |
| Premium | $29/month | Unlimited | Daily publishers and freelance writers |
Start with the free plan. If you find yourself hitting the 10,000 character limit before the month ends — which means AI writing is working for you — upgrade to Unlimited at $9/month. The Premium plan makes sense when you’re publishing daily or using Rytr for client work.
Start your free Rytr account here →
Common Rytr Mistakes to Avoid
Generating the whole article at once
The Blog Post section option lets you generate an entire article in one go. Don’t use it. The output is generic and hard to edit. Section-by-section generation takes slightly longer but produces significantly better results.
Publishing without editing
Rytr output is a first draft, not a finished article. Always read, edit, and add your own perspective before publishing. Raw AI content is detectable and ranks poorly.
Using vague inputs
The quality of Rytr’s output depends entirely on the quality of your input. “Write about AI tools” produces generic output. “Write a section about why Rytr is the best budget AI writing tool for bloggers who publish 3x per week” produces something usable.
Ignoring the tone selector
Most beginners leave the tone on the default setting for everything. Taking 10 seconds to match the tone to your content type noticeably improves output quality.
More Rytr Resources
- Rytr Review 2026 — Full Feature and Pricing Breakdown
- Rytr vs Frase.io — Which Tool is Right for You?
- Best AI Writing Tools for Bloggers in 2026
- How to Write a Blog Post Faster with AI Tools
- Best Free AI Writing Tools in 2026
- AI Writing Tools for Beginners: Complete Guide
Frequently Asked Questions
Is Rytr easy to learn for complete beginners?
Yes — Rytr is one of the easiest AI writing tools to learn. Most users are productive within an hour of signing up. The template-based workflow means you don’t need to know anything about AI or prompt engineering to get useful output immediately.
How long does it take to write a blog post with Rytr?
Following the workflow in this tutorial, most 1,000-1,500 word blog posts take 45-60 minutes from start to publish-ready draft. That’s significantly faster than writing from scratch, which typically takes 2-4 hours for most bloggers.
Can I use Rytr for free forever?
Yes — Rytr’s free plan is permanent, not a trial. You get 10,000 characters per month indefinitely. The limit resets every month. For bloggers publishing 1-2 articles per month the free plan may be sufficient long-term.
Does Rytr work in languages other than English?
Yes — Rytr supports 30+ languages including Spanish, French, German, Portuguese, Italian, and more. The quality varies by language but English output is consistently the strongest.
What’s the difference between Rytr and ChatGPT for blogging?
Rytr has pre-built templates specifically designed for blog content creation — outlines, section writing, meta descriptions, and more. ChatGPT is more versatile but requires you to write detailed prompts from scratch each time. For bloggers who want to get productive immediately without learning prompt engineering, Rytr is the faster starting point. See our full AI writing tools vs ChatGPT comparison for more detail.